There I was, fresh off a humid morning run around Lady Bird Lake here in Austin, standing under my bedroom fan and aggressively yanking the pull chain. One click? Too slow. Two clicks? Still not enough. Three clicks? Finally, a breeze—but now the motor was humming like a jet engine.
I’ll be honest: I spent months eyeing those gorgeous, $400 smart fans in high-end showrooms, convinced that was the only way to get “Alexa, turn on the fan” convenience. But as someone who obsesses over High Lifestyle ROI, I couldn’t justify the cost (or the waste) of tossing a perfectly functional fan just because it lacked a brain.
That’s when I stumbled onto the $29 retrofit kit. It’s a small, black “brick” that hides inside your fan’s ceiling mount. It changed my Sunday reset rituals forever, and today, I’m walking you through exactly how to do it yourself.
The ‘Dumb’ Fan Dilemma: Why Retrofit Instead of Replace?
We’ve all been there—digging through couch cushions for a lost RF remote or trying to remember which pull chain controls the light versus the blades. It feels outdated, but according to design experts at The Spruce, ceiling fans themselves are far from “out” [1]. They are essential for airflow, especially in older Austin homes.
The real problem isn’t the fan; it’s the interface. Replacing a whole unit involves heavy lifting, potentially different mounting hardware, and a much larger hit to your bank account. A retrofit kit, however, gives you 90% of the features of a high-end smart fan for less than the cost of a nice brunch.
The $29 Solution: The Universal Wi-Fi Receiver Kit
Here’s the thing about “smart” home gadgets: they don’t have to be expensive to be reliable. I spent hours reading through forums and tech specs before settling on a universal Wi-Fi receiver. I was tired of reaching for a remote that was never where I left it, and I wanted my fan to automatically kick on when my bedroom hit 74 degrees.
I finally picked up a conversion kit that promised to slide right into my existing fan’s canopy. It came with the Wi-Fi receiver unit and a brand-new handheld remote as a backup. What surprised me was how such a small device could handle three speeds and full light control without a separate hub.
Micro-Verdict: The most cost-effective way to modernise your climate control without the headache of a full fixture replacement.
Compatibility Check: Can Your Fan Go Smart?
Before you grab your screwdriver, we need to make sure your fan is a candidate for this upgrade. Most “dumb” fans are compatible, but there are a few technical non-negotiables:
- AC Motors Only: Most budget $29 kits are designed for traditional AC motors. If you have a high-end DC motor fan, it likely already has proprietary smart features or requires a specific (and more expensive) manufacturer kit.
- Pull Chains or Existing Remotes: If your fan currently operates via pull chains, you’re good to go. If it already has a remote, you’ll be replacing that old receiver with the new smart one.
- Ceiling Box Rating: Safety is huge here. According to Atomi Smart, your ceiling box should be fan-rated and capable of supporting at least 70 lbs [2].
- 2.4 GHz Wi-Fi: Like most affordable home automation gadgets, these kits require a 2.4 GHz Wi-Fi band. They usually won’t pair on a 5 GHz-only network.
Step-by-Step: Installing the $29 Smart Fan Controller
I’ll admit—I was a little nervous about the wiring at first. But once I realized it’s basically like a Lego set for adults, it clicked.
Safety Warning: You are working with mains voltage. Per the National Electrical Code (NEC), you must ensure the power is completely disconnected before touching any wires [3]. Don’t just flip the wall switch; go to your breaker panel and kill the power to the room.
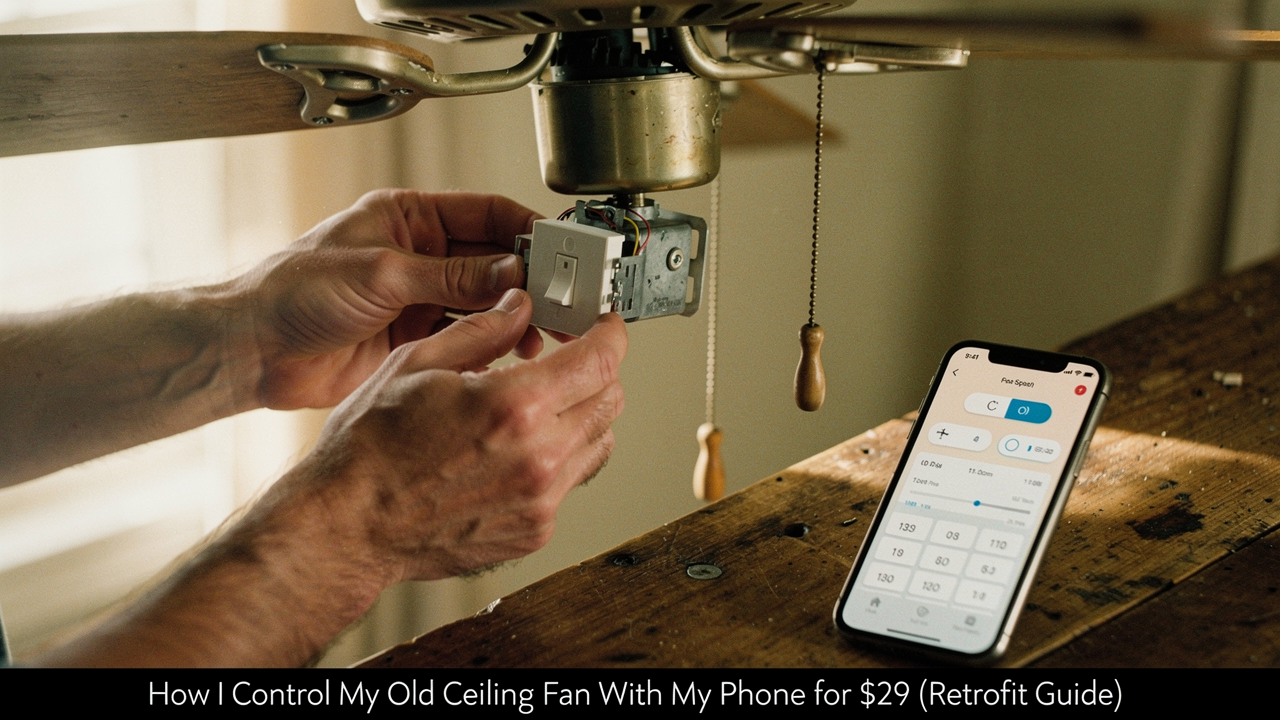
Wiring the Receiver
The receiver has two sides: “In” and “Out.” The “In” side connects to the wires coming out of your ceiling (usually Black for Power, White for Neutral, and Green or Bare for Ground). The “Out” side connects to your fan’s internal wires (typically Black for the Fan, Blue for the Light, and White for Neutral).
Fitting the ‘Brick’ in the Canopy
This is where the struggle usually happens. The receiver is about the size of a deck of cards. In most modern fans, the “canopy” (the bowl-shaped piece against the ceiling) has plenty of room. If your space is tight, here is my trick: tuck the wire nuts as far up into the junction box as possible to leave the lower part of the canopy free for the receiver.
App Setup and Voice Control Integration
Once the power is back on, your fan might beep or the light might flash—that’s it telling you it’s in pairing mode. Most of these $29 kits use the Smart Life or Tuya app.
The documentation for these platforms usually offers two pairing modes: “EZ Mode” (fast blinking) or “AP Mode” (slow blinking) if your Wi-Fi is being finicky [4]. I found that disabling my phone’s cellular data for five minutes during the setup helped the app find the fan instantly. Once it’s in the app, you can link it to Alexa or Google Home with one click, and suddenly, you’re living in the future.
The Optimization Win: Real-World Automations
This is the “High Lifestyle ROI” part I love. It’s not just about being lazy (though staying in bed to turn off the fan is a mood). It’s about efficiency.
According to the U.S. Energy Information Administration (EIA), using fans strategically can significantly reduce the load on your air conditioner [5]. Energy Star also notes that smart controls allow for better scheduling, ensuring you aren’t cooling an empty room [6].
In my house, I’ve set a “Sleep Tight” routine:
- 10:00 PM: Fan turns to Medium speed.
- 2:00 AM: Fan drops to Low speed as the house cools down naturally.
- 7:00 AM: Fan turns off to help me wake up.
Alternatives: When the $29 Kit Isn’t Right
Sometimes, the in-canopy “brick” isn’t the best move. Depending on your home, you might prefer these options:
The Minimalist (Smart Wall Switch)
If you have separate wall switches for your fan and your light, an in-wall smart switch might be cleaner.
- Essential: A Meross Smart Fan Control Switch [7]
- Requirement: You MUST have a Neutral wire (usually a bundle of white wires) in your switch box.
- Pro: No need to climb a ladder or open the fan canopy.
The Total Upgrade (New Smart Fan)
If your current fan is wobbling, squeaking, or just plain ugly, it might be time for a fresh start.
- Essential: A Hunter or Modern Forms Smart Fan.
- Pro Upgrade: Look for a DC motor model—they are up to 70% more energy-efficient than your old AC fan.
Living well doesn’t require a total renovation. Often, it just takes one small, thoughtful $29 upgrade to make your daily routine flow a little better. Happy retrofitting!
Disclaimer: This guide involves working with electrical wiring. If you are not comfortable with DIY electrical work, please consult a licensed electrician. Always turn off the power at the breaker before starting.
References
- The Spruce (2024), “Are Ceiling Fans Outdated? Experts Weigh In.” https://www.thespruce.com/are-ceiling-fans-outdated-11734038
- Atomi Smart (2023), “Ceiling Fan Installation Safety and Weight Ratings.” https://pdf.lowes.com/productdocuments/8cdef710-2334-4ba0-9925-c7f85e8e0d11/70229430.pdf
- NFPA (2023), “National Electrical Code (NEC) NFPA 70: Standard for Electrical Safety.” https://www.nfpa.org/codes-and-standards/nfpa-70-standard-development/70
- Tuya Smart (2024), “User Guide: EZ vs. AP Pairing Modes for Wi-Fi Devices.” https://developer.tuya.com/en/docs/iot/app-development/smart-life-app-sdk
- U.S. Energy Information Administration (2023), “Residential Energy Consumption Survey (RECS): Cooling and Fan Usage.” https://www.eia.gov
- Energy Star (2024), “Ceiling Fan Efficiency and Smart Control Benefits.” https://www.energystar.gov
- Meross (2024), “MFC100HK Smart Wi-Fi Fan and Light Switch Specification Sheet.” https://shop.meross.com/products/meross-wi-fi-smart-fan-control-mfc100hk