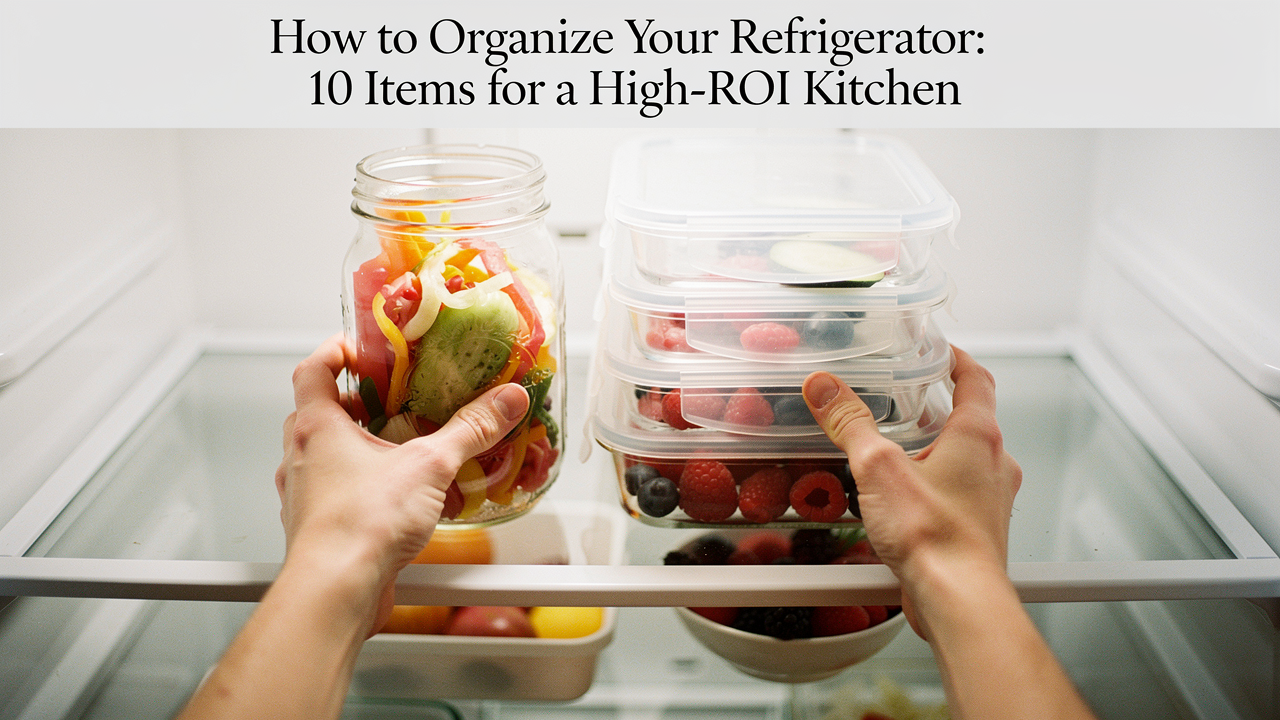
Here’s the thing: a cluttered refrigerator isn’t just an eyesore; it’s a drain on your “Lifestyle ROI.” In my world, High Lifestyle ROI means getting the most joy and efficiency out of the items you own. When your fridge is a chaotic mess, you waste money on duplicate groceries, you waste time hunting for the mustard, and you waste food that simply got lost in the shadows.
I used to treat my fridge like a temporary storage locker rather than a tool for wellness. What finally clicked for me was realizing that an organized space is the ultimate form of self-care. When you can see everything you have, you eat better, cook faster, and feel a sense of calm every time you open that door. Let’s walk through a science-backed system to reset your space in about 30 minutes, using tools that actually earn their keep.
The Science of the Chill: Why Organization Matters
Before we get to the pretty bins, we need to talk about why where you put things actually matters for your health. Your refrigerator isn’t a uniform box of cold air; it’s a complex ecosystem of temperature gradients.
The USDA Food Safety and Inspection Service identifies the “Danger Zone” as the temperature range between 40°F and 140°F [1]. In this range, bacteria can double in number in as little as 20 minutes. Most of us have our fridges set correctly, but overpacking can kill the airflow needed to maintain those temps. According to research from the University of California, blocked vents and crowded shelves lead to “hot spots” where food spoils significantly faster [2].
Then there’s the microbiology of it all. Spoilage organisms—the yeasts and molds that make your bread fuzzy or your milk sour—thrive when cross-contamination occurs [3]. This is why keeping raw meat on the lowest shelf isn’t just a suggestion; it’s a safety barrier to prevent drips from contaminating your fresh produce.
The 30-Minute Refrigerator Reset
I’ll be honest: I used to ignore the deep-clean because it felt like a three-hour ordeal. But I’ve found that a “clutter cleansing” protocol makes it totally manageable. If you’re feeling overwhelmed, set a timer for 30 minutes and follow this flow:
- Empty (10 mins): Take everything out. Yes, everything. If it’s expired or you haven’t touched it in six months (looking at you, artichoke tapenade), let it go.
- Clean (5 mins): Wipe down the shelves with warm, soapy water. Skip the harsh chemicals; you don’t want those near your fresh berries.
- Categorize (5 mins): Group items by how you use them. I like categories like “Breakfast,” “Sandwich Station,” and “Quick Snacks.”
- Zone (10 mins): Place items back based on temperature. Upper shelves are for leftovers and drinks (consistent temp); lower shelves for dairy and eggs (colder); bottom shelf for raw meat; and the door for condiments (warmest spot).
10 Items to Help You Better Organize Your Fridge
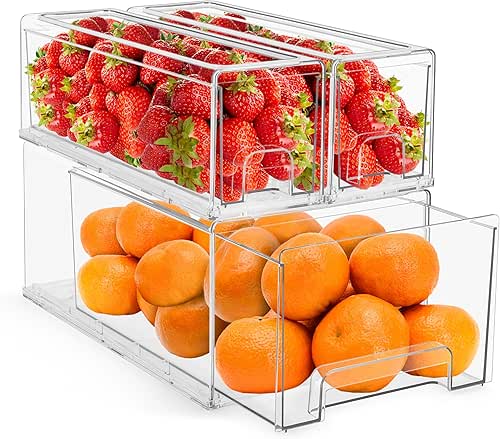
1. Clear Stackable Bins (The Visibility Kings)
Let let me be honest—”refrigerator blindness” is a real thing. I can’t tell you how many times I’ve bought a second carton of heavy cream because the first one was hidden behind a giant head of cabbage. I struggled with this for years until I realized that if I can’t see it, I won’t use it.
I eventually switched to clear, modular bins, and it changed the way I shop. Now, I can pull out an entire “Morning Smoothie” bin, grab what I need, and slide it back. It keeps everything contained and, more importantly, visible.
The real win here: Total visibility that prevents the “accidental duplicate” grocery haul.
2. The ‘Lazy Susan’ Turntable
You know that dark corner at the back of the top shelf where jars go to die? That was my daily reality until I discovered the magic of a turntable. I used to have to move five different jars of jam just to find the capers. Now, a quick spin brings everything to the front. I’ve found these are non-negotiable for condiment lovers who want to maximize every inch of shelf depth.
What sold me: No more digging through the “condiment graveyard” in the back corners.

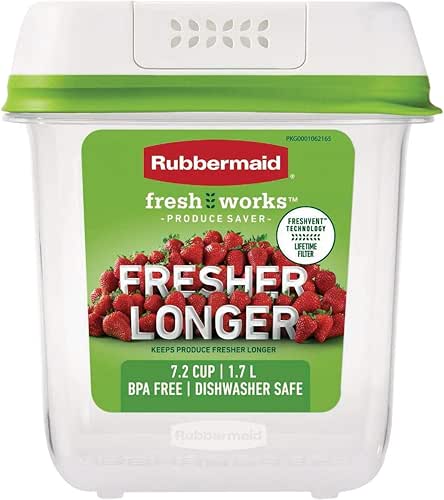
3. Vented Produce Savers
I used to feel so much guilt watching my fresh spinach turn into a slimy mess within three days. I tried the paper towel trick, the glass jar trick, and everything in between. What actually worked was understanding the science of ethylene gas and humidity. These vented containers allow produce to “breathe” while keeping the humidity levels just right. UConn Food Safety research notes that proper produce respiration is the key to extending shelf life [4].
The game-changer: Keeping berries and greens fresh for up to twice as long.
4. Pro-Style Deli Containers
In Austin, we have a lot of “optimization geeks,” and one tip I picked up from the pro chefs in town is to ditch the mismatched plasticware. I used to have a cabinet full of lids that didn’t fit anything. These stackable deli containers are what restaurants use because they are uniform, cheap, and indestructible. They make your leftovers look intentional and organized, which weirdly makes me more likely to actually eat them for lunch.
Bottom line: Professional-grade stacking that saves massive amounts of shelf space.
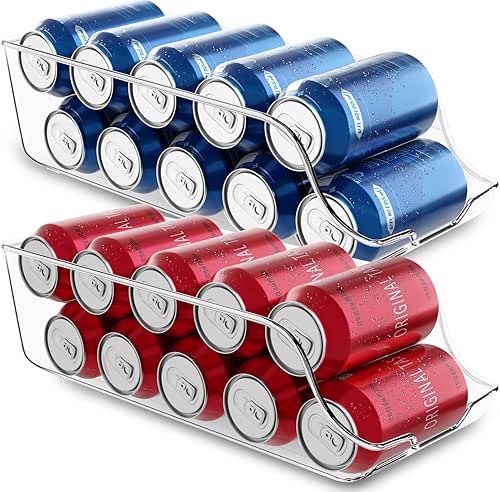
5. Soda Can Dispensers
I’ll admit it—I’m a sparkling water addict. My fridge used to be a chaotic sea of rolling cans that would fall out every time I reached for the milk. I finally invested in a gravity-fed dispenser, and the “avalanche” stopped immediately. It uses vertical space that usually goes to waste and keeps my favorite drinks icy cold and neatly aligned.
The real win here: Stop the rolling can avalanche and reclaim your shelf space.
6. Hanging Under-Shelf Drawers
If you live in a smaller apartment or a rental with a basic fridge, you know the frustration of “dead space.” You have six inches of empty air above your eggs, but nowhere to put your cheese sticks. I found these clip-on drawers that utilize that vertical gap. It’s like adding a new shelf without actually having to drill anything.
The real win here: Creating extra storage out of thin air in small fridges.
7. Stackable Egg Trays
Cardboard egg cartons are surprisingly flimsy and, quite frankly, a bit gross after a week in the fridge. I was skeptical at first—why buy a container for something that comes in one? But these clear, stackable trays are built to last and allow you to stack other items on top of them without the risk of a messy crack. Plus, seeing exactly how many eggs you have left at a glance is a small but mighty win.
What sold me: The ability to stack heavy items on top of eggs safely.
8. Wine & Bottle Racks
There is nothing more annoying than a bottle of chilled rosé rolling around and clinking against your glass jars. I struggled with this every time I hosted a Sunday dinner. These stackable racks keep bottles stationary and allow you to stack them vertically, which is a huge ROI for anyone who likes to keep a few bottles of wine or kombucha ready to go.
The game-changer: Safe, stable vertical storage for all your favorite bottles.
9. Glass Meal Prep Containers
As I’ve moved toward a more intentional, sustainable home, I’ve started phasing out plastic where I can. These glass containers were a big part of that. They don’t stain (even with my favorite turmeric-heavy curries), they are oven-safe, and they look beautiful on the shelf. There’s something so satisfying about a row of glass containers filled with prepped ingredients for the week.
Bottom line: Long-lasting, stain-resistant storage that goes from fridge to oven.
10. Erasable Labeling System
What finally clicked for my “Sunday Reset” routine was the realization that I couldn’t remember when I opened that broth or made that soup. Mystery leftovers are the #1 cause of food waste. I started using these erasable labels to mark everything with a name and a date. It’s a simple “First In, First Out” (FIFO) system that ensures nothing gets lost in the shuffle.
What sold me: No more “sniff tests” to figure out if leftovers are still safe.
Customizing for Your ‘Fridge Persona’
Not every fridge should look the same. Depending on your lifestyle, your “loadout” of organizers will change. Here is how I recommend prioritizing your purchases based on who you are:
The Minimalist Remote Worker (Small Spaces)
If you’re working with a studio-sized fridge and want to keep things lean and mean:
- Essential: Hanging under-shelf drawers to reclaim vertical space
- Essential: A single Lazy Susan for all your daily-use condiments
- Essential: Pro-style deli containers (they nest perfectly when empty)
- Pro Upgrade: A single vented produce saver for your salad greens
The Meal-Prep Pro
If you spend your Sundays prepping every macro and snack for the week:
- Essential: A full set of Glass Meal Prep containers for stacking
- Essential: Erasable labeling system to track your “prep dates”
- Essential: Clear stackable bins to group ingredients by recipe
- Pro Upgrade: Vented produce savers to keep your pre-washed veggies crisp
The Busy Family
If you’re managing multiple appetites and a lot of “kid-friendly” snacks:
- Essential: Soda can dispensers for juice boxes and sparkling water
- Essential: Clear bins at eye-level for healthy, grab-and-go snacks
- Essential: Stackable egg trays to protect against accidental kitchen chaos
- Pro Upgrade: Multiple Lazy Susans to make sure no one has to dig for the jelly
Maintaining the Flow: The 5-Minute Sunday Audit
Here’s a secret: the best organization system in the world won’t work if you don’t maintain it. I’ve integrated a “5-Minute Sunday Audit” into my routine, usually right after I check on my sourdough starter.
Before I head to the grocery store, I do a quick scan. I move the older items to the front (FIFO!), wipe down any sticky rings from the milk carton, and check my labels. This tiny habit prevents the fridge from ever reaching “disaster status” again. It keeps the energy in my kitchen light and intentional, which is the ultimate goal.
When your environment supports you, everything flows better. Start with just one zone—maybe just the door or the snack drawer—and see how it feels. I promise, once you experience that High-ROI clarity, you won’t want to go back.
***
Affiliate Disclosure: This post contains links to recommended products where we may earn a commission at no extra cost to you.
References
- USDA Food Safety and Inspection Service (2024). “Danger Zone” (40 °F – 140 °F). https://www.fsis.usda.gov/food-safety/safe-food-handling-and-preparation/food-safety-basics/danger-zone-40-f-140-f
- University of California Agriculture and Natural Resources (2023). “Keep Your Food from Spoiling.” https://www.universityofcalifornia.edu/sites/default/files/keep-food-from-spoiling.pdf
- American Society for Microbiology (2024). “The Microbiology of Food Spoilage in Your Refrigerator.” https://asm.org/articles/2024/september/the-microbiology-of-food-spoilage-in-your-refriger
- UConn Food Safety (2024). “Storing Food in the Refrigerator, Freezer, or Pantry.” https://foodsafety.uconn.edu/storing-food-in-the-refrigerator-freezer-or-pantry/