I checked my phone—no bars on the Wi-Fi icon. I ran to the router, but by the time I rebooted it and got back online, I’d missed five minutes of the meeting and my sourdough had over-proofed into a sad, flat mess.
The worst part wasn’t just the technical failure; it was the silent nature of it. I had no idea my internet had dropped until the moment I needed it most. That’s when I realized that most of us are living with a massive “Lifestyle ROI” deficit. We invest in high-speed fiber and smart home tech, yet we have no way of knowing when the heartbeat of our home—our connectivity—stops beating. I decided to solve that for under five dollars.
The Frustration of the ‘Silent’ Internet Outage
The problem with modern networking is what I call the “Observer Paradox.” You probably have a router app on your phone that promises to keep you informed. But here’s the thing: if your router goes down, it can’t send a notification to the app. You only realize the internet goes down unnoticed when you try to refresh a page or your smart speaker gives you that dreaded red ring.
For those of us working from home or running micro-businesses, this isn’t just a minor annoyance. According to research on the “Network Outage Cycle,” an outage typically moves through three phases: detection, containment, and resolution [1]. Most people waste 80% of their time just on the “detection” phase.
If you don’t know about a failure immediately, you’re losing more than just minutes; you’re losing professional credibility. Statistics show that network downtime can cost micro-businesses thousands in lost billable hours and missed opportunities [2]. Knowing about Wi-Fi failure the second it happens allows you to pivot—switch to a mobile hotspot, move your meeting, or at least inform your clients before you disappear into the digital void.
Understanding Your Failure Modes: Wi-Fi vs. WAN
Before we build the fix, we have to understand what we’re actually monitoring. Not all outages are created equal. After spending hours digging into network diagnostics, I’ve found that most “internet is down” complaints fall into four specific buckets:
- Local Wi-Fi Failure: Your router is on, but the Wi-Fi radio has glitched or there is massive interference [3].
- Router Freeze: The hardware has locked up. Pings to the gateway fail.
- ISP/WAN Outage: Your equipment is fine, but the fiber or cable line from your provider is dead.
- Power Failure: The most obvious, but often confused with a network drop if you aren’t home.
Expert monitoring tools like PRTG use “remote probes” to distinguish between these states [4]. For our home setup, we want a device that performs an “Inside-Out” check—something that lives on your desk, breathes your Wi-Fi, and screams the moment it can’t reach the outside world.
Level 1: The ‘Zero-Dollar’ Cloud Monitor
If you aren’t ready to build hardware yet, you can set up a “Cloud Monitor” in about five minutes. This is what IT pros call “Outside-In” monitoring. You essentially ask a server in a different city to knock on your home’s digital door every few minutes. If no one answers, the server sends you an email or a push notification.
I started my journey with UptimeRobot. It’s a fantastic entry-level tool that offers 50 monitors for free [5]. You simply point it at your home’s public IP address. Here is the catch: most home IP addresses change every time your router reboots. To fix this, I followed some great advice from the TP-Link community and set up a Dynamic DNS (DDNS) [6]. This gives your home a permanent “name” (like jordan-austin-home.tplinkdns.com) so the monitor never loses you.
While this is great for a real-time Wi-Fi downtime alert, the free tier only checks every five minutes. That’s still five minutes of sourdough-ruining silence. To get faster, we need to go DIY.
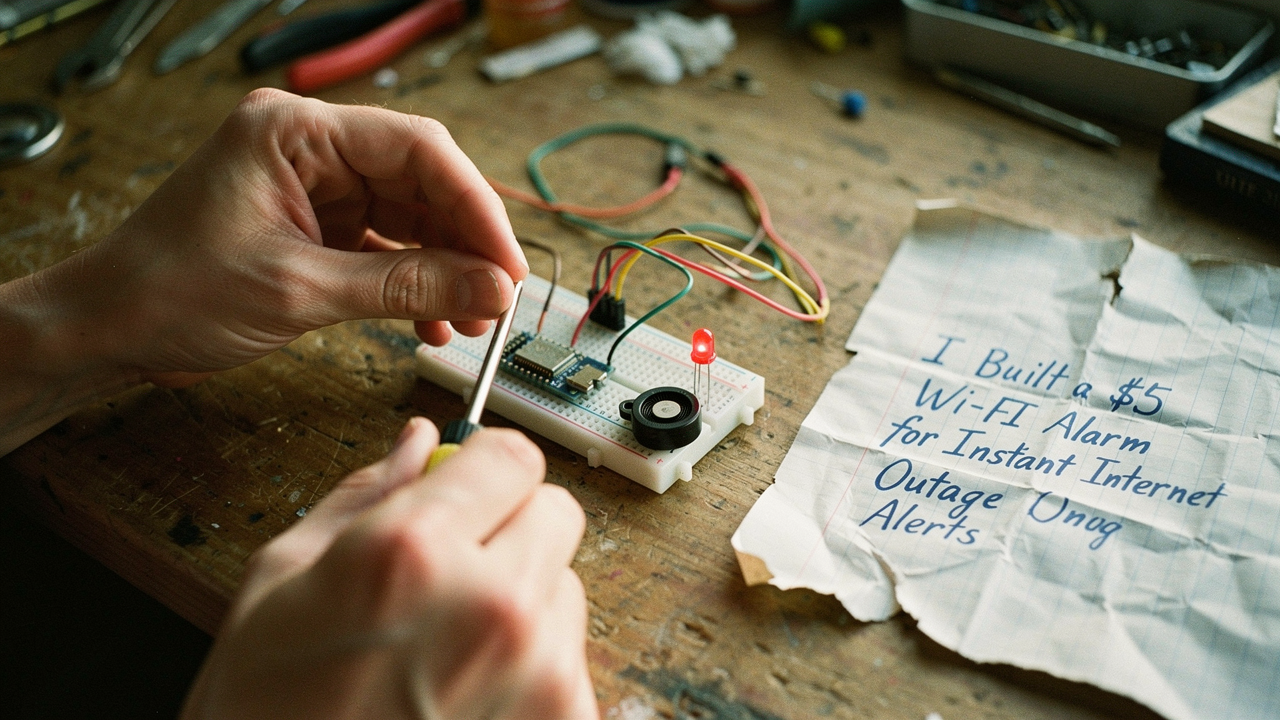
Level 2: The $5 DIY Wi-Fi Alarm Build
This was the “clicked” moment for me. I wanted something tactile. I wanted a physical alarm on my desk that would beep the moment the packets stopped flowing. I looked at expensive commercial network monitors, but they felt like overkill for my Austin apartment. Then I found the ESP8266—a tiny, $5 microcontroller with built-in Wi-Fi.
I’ll be honest, I was skeptical that something so cheap could be reliable. But after researching how hobbyists use these for “heartbeat” sensors, I realized it was the perfect High Lifestyle ROI project. I programmed the chip to ping Google’s DNS server (8.8.8.8) every 30 seconds. If the ping fails three times in a row, a small piezo buzzer sounds an alarm. It’s simple, elegant, and incredibly effective.
The real win here: It detects a total internet failure in under 90 seconds for less than the cost of a fancy taco.
Bill of Materials (The $5 Breakdown)
To keep things organized, I’ve broken down exactly what I used. Most of these can be found in bulk, so if you have a couple of tech-inclined friends, you can build these together over Sunday morning coffee.
- Essential: ESP8266 NodeMCU or ESP-01 Module (~$4.00 when bought in a pack)
- Essential: Active Piezo Buzzer 5V (~$0.50)
- Essential: Micro-USB Cable and old phone charger (You likely have these in a “junk drawer”)
- Pro Upgrade: A small 3D-printed case or a recycled mint tin to keep it looking tidy on your desk
The Code: Making the Buzzer Scream
The magic happens in the firmware. You don’t need to be a software engineer to get this running. The logic uses a “Watchdog Timer” concept. The device stays in a loop: “Can I see the internet? Yes? Cool, blink a green LED and wait 30 seconds. No? Try again. Still no? Wake the neighbors.”
This creates an instant notification when internet goes offline because the device is sitting right next to you. It doesn’t rely on the cloud to tell you that the cloud is missing.
Level 3: Professional Out-of-Band Solutions
While the DIY route is fun for a Saturday afternoon, some of you might need “Five-Nines” reliability—especially if you’re monitoring a vacation rental or a home security system from afar. The problem with both the Cloud Monitor and the DIY Alarm is that they rely on some part of your local environment being functional.
If your power goes out entirely, your DIY alarm dies. If your ISP goes down, your phone might not get the push notification if it’s also on that same Wi-Fi. This is where “Out-of-Band” solutions come in. These are dedicated devices with their own cellular connections.
I found a device called the iSocket during a deep dive into power-outage solutions. I was initially hesitant because of the subscription cost, but then I looked at the data. In the U.S. alone, there are over 230,000 power outages annually [7]. If you have a freezer full of organic grass-fed beef or a wine cellar, the “Lifestyle ROI” of a $4/month subscription becomes very clear. The iSocket doesn’t care if your Wi-Fi is dead or your power is out; it uses the cellular network to text you the second things go sideways [8].
The game-changer: Immediate SMS alerts that work even when the power grid fails.
Which Alert Persona Are You?
Choosing the right affordable network monitoring device depends on your specific “Good Life” requirements:
- The Minimalist Remote Worker: Stick with Level 1. Set up UptimeRobot and a DDNS. It’s free, requires zero hardware, and provides “good enough” alerts for most people.
- The Austin Maker (The Geek): Build the $5 DIY Alarm. It’s a fun project, offers the fastest local detection, and has zero monthly fees.
- The High-Stakes Pro: Invest in the iSocket. If you lose money when the internet or power is down—or if you have thousands of dollars in groceries at risk—this is the only solution with a guaranteed “out-of-band” notification path.
Investing time into your home’s “nervous system” might seem like a small thing, but it’s these little optimizations that create a truly intentional space. Now, when my internet blips, I’m the first to know. I can save my meeting, save my sourdough, and keep my day flowing.
What’s the longest you’ve gone without realizing your internet was down? Comment below and let me know. And if you’re into these kinds of home optimization hacks, don’t forget to subscribe for my weekly Austin-based updates.
—
Safety Disclaimer: This project involves low-voltage DC power (5V via USB). Always use a certified USB power supply and avoid exposing electronics to moisture. This guide is for educational purposes.
References
- Ubifi. (2024). The Network Outage Cycle: Detection, Containment, and Resolution. https://ubifi.net/blog/what-is-internet-outage
- TailWind Voice & Data. (2025). The Real Cost of Network Downtime for Small Businesses. https://www.tailwindvoiceanddata.com/blog/network-downtime-definition-cost-how-to-reduce-it
- Acrylic WiFi. (2024). Differentiating Wi-Fi Interference from Link Failure. https://www.acrylicwifi.com/en/blog/most-common-wifi-problems-solution
- Paessler. (2025). Using Remote Probes for Connectivity Monitoring. https://helpdesk.paessler.com/en/support/solutions/articles/76000082292-receive-notifications-when-internet-connection-is-down
- UptimeRobot. (2025). Free Tier Monitoring and Alerting Specifications. https://uptimerobot.com
- TP-Link Community. (2024). Setting Up DDNS for Remote Network Access. https://community.tp-link.com/en/home/forum/topic/652408
- Whisker Labs (Ting). (2025). National Power Outage Trends and Real-Time Detection. https://www.tingfire.com/blog/free-power-outage-alerts-in-the-ting-app
- iSocket Systems. (2025). Technical Documentation: Cellular Out-of-Band Power and Internet Monitoring. https://www.isocket.us/power-outage-alarm